Thursday, July 3, 2014

KWF Big Knitting Needles for Bigger Stitches

New from Knitting with Friends are a great line of Big Knitting Needles. Sizes start at US 17 (15 mm) working up to US 50 (25 mm) and range in length from a very manageable 12 inches to a wopping 36 inches.
Sets of 4 DPNs are also available in all sizes and start from just $18 a set for the smaller sizes to $24 a set for the US 50, that's for all 4 needles!

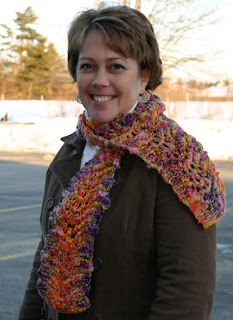
The sample scarf is worked on size 50 needles using one skein of Ivy Brambles Tornado (Eggplant) and 2 skeins of Berroco Peruvia Quick (Black) worked in 4 strands, 2 of each yarn. Casting on just 8 stitches this scarf takes only a hour or so to make and measures approximately 6 inches wide and 5-6 ft long after blocking.


Saturday, July 20, 2013

Easy neat one row buttonhole

There have been so many different designs for something as simple as a buttonhole that it can be confusing to try to decide which to use. When I needed a button hole for a cardigan I was designing I tried a few different methods and decided that some were just not pretty, and others a bit too awkward for the overall effect.
Let's look at this objectively.
There are three distinct types of button holes (that I know about):
Two row button holes, where you bind off stitches and then cast them back on. This produces a nice top and bottom but the sides are weaker looking and it can product a lumpy buttonhole. The overall shape is a slit.
One row button holes (without reversing) which incorporate a decrease and a yarn over. This produces a nice round button hole but isn't necessarily uniform.
One row button holes that require a short row technique. Personally I don't like these as they are difficult to work without ending up looking like a mess. You can also end up with two holes if you are not careful.
I opted to go with a simple one row buttonhole in my design. The classic is either a yo, ssk, or k2tog, yo. The only thing I did not like about either of these is you get a thick stitch on one side and a thin one on the other. My compromise is simple and works over 3 stitches:
(k1, yo, sl1, k1, psso)
It sounds pretty much the same as doing a (k1, yo, k2tog) except that a psso is towards the bottom of the button hole (like a bind off) not at one side, this produces a more uniform round buttonhole than with an ssk or k2tog. See picture.
Remember whatever technique you use, make sure your button hole will fit the button. Always do a test swatch before starting your buttonhole band!

Friday, May 17, 2013

Provisional Cast On - Easy to remove


I was surprised to learn that many knitters when asked to do a provisional cast on simply did a regular cast on with scrap yarn and then knit with the working yarn. It is fairly easy to then pick up the stitches but a real pain to remove the waste yarn, usually resulting in use of scissors. However there is an easier way, read on......

Provisional Cast On 
A simple cast on using a simple loop method and a length of scrap yarn. The scrap yarn can be later removed to reveal live stitches that can be grafted or knit in the opposite direction for a seamless join. This cast on should be done very loosely.
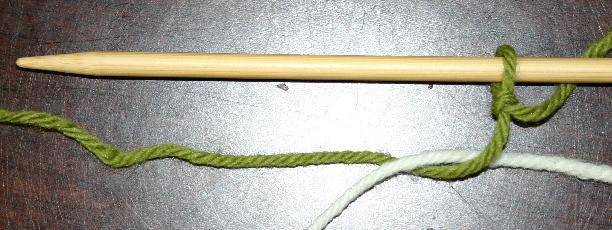
Step 1 - Make a slip knot with the working thread and place it on the needle. Lay the length of scrap yarn alongside and below the working thread.
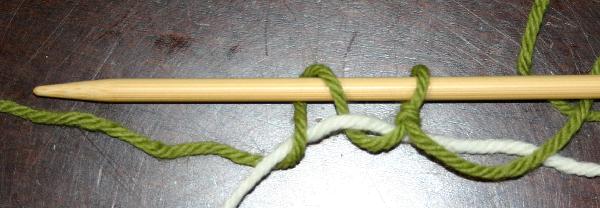
Step 2 - Bring the working thread downwards in front of, then underneath the waste yarn.
Step 3 - Now bring the working thread up and over the needle
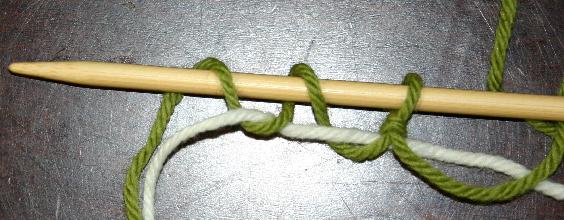
Step 4 - Bring the working thread downwards in front of, then underneath the waste yarn.
Repeat steps 3 and 4 until you have the required number of stitches on the needle. End by moving the working thread in front of and under the waste yarn. Make sure you have an equal number of stitches around the waste yarn as you have on the needle.
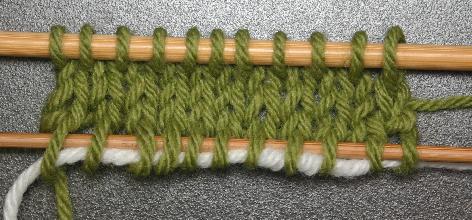
This is what it will look like after a few rows. Note we have picked up the stitches with a small double point needle to better show the live stitches. You will do this when you are required to work these stitches in your pattern. The waste yarn can simply be slipped out from the cast on stitches with no effort.

Thursday, September 6, 2012

New Knitting With Friends Designs

Thanks to all our friends out there with their suggestions for new shirt and card designs. Finally we got to the computer after a few very busy trade shows and put some of these designs from ink to the drawing board.
We have eight new designs including a new crochet design. These will be available first as greeting cards and as shirts within the next few weeks.

Here is the first preview:


Saturday, June 9, 2012

Ivy Brambles Tornado Thick and Thin


It isn't often that you just come across a yarn that really is different to all the rest. Ivy Brambles Tornado is just one of those. Aaprt from the spectacular way it takes to Ivy's nature inspired colorways, it is also fabulous to knit with. 100% soft merino wool just glides on large needles. Not wishing to just knit up a stockinette shrug or scarf (way too boring) we decided to go with a classic lace pattern and supersize it!

 Materials:
Yarn: Two skeins Ivy Brambles Tornado Yarn, shown in Celosia colorway.
Needles: US #13 (9 mm) 40-48 inch circular knitting needles.
Other: Stitch markers, 4 buttons, darning needle
Gauge: Approx 8 sts per 4 inches (10 cm) before blocking
Finished dimensions: Approximately 60 x 22 inches (150 x 56 cm)

We finished this one in Wildflowers colorway.

Saturday, September 10, 2011

Lace Knitting in Pure Silk - Evening Star Shawl

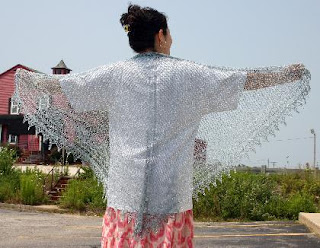
There's more to lace knitting than just yarn over knit two together, right? Well while that is true it does give a breathing space to all that pattern work. The Evening Star Shawl by Jocre arts is made with one skein of Ivy Brambles Pure Silk (shown in Night Sky) and features silver lined size 8 seed beads. The shawl is quite stunning and at first glance looks like a lot of work, but is it?

Working on size 4 needles the shawl starts with a small lace pattern, with just a few stitches cast on, the increases are worked down the spine extending the small lace pattern with a feather and fan (simply yo, k2tog) creating the triangle. The shawl is finished by picking up the stitches across the top edge and adding the borders.

Would I consider it an easy shawl? It certainly isn't difficult. The beading is added as you go using a small crochet hook and a very simple technique described in the pattern. The lace work is manageable with no oh so complex or difficult stitches. Using stitch markers we can isolate each section, and the feather and fan gives us time to breath and moves the project along quickly. If you don't knit tight and can read a chart this project is definitely not difficult. If not then perhaps it time to learn!

What about working with silk? Silk, at least high quality silk like Ivy Brambles Pure Silk, is very nice to work with. It can stand being ripped out many times without breaking or fuzzing. Stitch definition is excellent showing off your handiwork like no other, and the silky shine is second to none. Add to that Ivy Brambles fabulous semi-solid translucent colors and you have a sure winner!

Monday, July 11, 2011

Blocking round shawls

If blocking a rectangular shawl is as simple as stretching it out to the right rectangular dimensions then blocking a round shawl should be stretching it out to the right circumference right?
Of course it is never as simple as that. There are several very imporant things to get right or your blocked shawl will not look right.
First, which is probably obvious, is to lay out the shawl on a blocking board. I prefer to do this with the board flat on a table. Then stretch by hand, loosly, to remove any wrinkles. Next and most important but often forgotten, pin the center of the shawl. All critical measurements will be done from the center.
If the shawl has points, as shown above in the example, a mystery shawl knit in Ivy Brambles Romantica we use these to aid in finding the edge. If it doesn't you will need to use curved blocking wires and identify points on the edge for taking measurements. If the shawl has points don't waste your time with curved blocking wires, they really don't help.
Block out evenly to size. Top to bottom and side to side (4 points) checking distances from the center and evenly spacing the points by measuring between them. Repeat this for all intermediate points making sure they are evenly spaced around the shawl and equidistant from the center.
If your shawl has distinct straight lines use straight blocking wires and pull the lines straight by threading the wire through the shawl about every 2 inches or as necessary. You may not need to straighten every line in this way but do at least four evenly spaced around the shawl. If your shawl does not have any straight lines, such as the mystery shawl pictured above, it may be sufficient to just smooth the pinned shawl by hand until it looks right. If it doesn't want to stay in place use a few more pins spaced evenly around the shawl, taking measurements from the center and between the pins.
Your shawl should now look perfect!
With Romantica we block the shawl by wetting it thoroughly with a hand spray bottle and leaving it to dry for 24 hours or more. If you did it right your shawl should stay blocked after being removed from the blocking board. A correctly blocked shawl should lay flat, be the correct size, and uniform in all dimensions.