Saturday, July 20, 2013

Easy neat one row buttonhole

There have been so many different designs for something as simple as a buttonhole that it can be confusing to try to decide which to use. When I needed a button hole for a cardigan I was designing I tried a few different methods and decided that some were just not pretty, and others a bit too awkward for the overall effect.
Let's look at this objectively.
There are three distinct types of button holes (that I know about):
Two row button holes, where you bind off stitches and then cast them back on. This produces a nice top and bottom but the sides are weaker looking and it can product a lumpy buttonhole. The overall shape is a slit.
One row button holes (without reversing) which incorporate a decrease and a yarn over. This produces a nice round button hole but isn't necessarily uniform.
One row button holes that require a short row technique. Personally I don't like these as they are difficult to work without ending up looking like a mess. You can also end up with two holes if you are not careful.
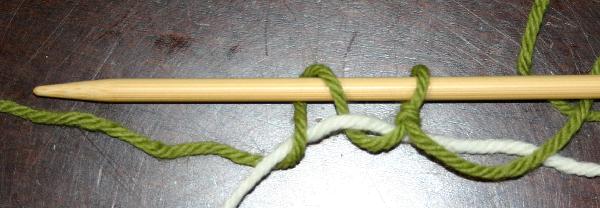
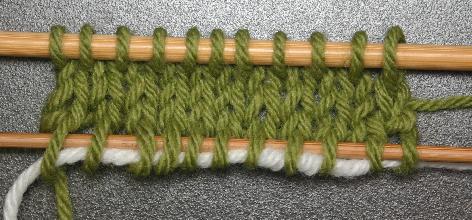
I opted to go with a simple one row buttonhole in my design. The classic is either a yo, ssk, or k2tog, yo. The only thing I did not like about either of these is you get a thick stitch on one side and a thin one on the other. My compromise is simple and works over 3 stitches:
(k1, yo, sl1, k1, psso)
It sounds pretty much the same as doing a (k1, yo, k2tog) except that a psso is towards the bottom of the button hole (like a bind off) not at one side, this produces a more uniform round buttonhole than with an ssk or k2tog. See picture.
Remember whatever technique you use, make sure your button hole will fit the button. Always do a test swatch before starting your buttonhole band!

Friday, May 17, 2013

Provisional Cast On - Easy to remove


I was surprised to learn that many knitters when asked to do a provisional cast on simply did a regular cast on with scrap yarn and then knit with the working yarn. It is fairly easy to then pick up the stitches but a real pain to remove the waste yarn, usually resulting in use of scissors. However there is an easier way, read on......

Provisional Cast On 
A simple cast on using a simple loop method and a length of scrap yarn. The scrap yarn can be later removed to reveal live stitches that can be grafted or knit in the opposite direction for a seamless join. This cast on should be done very loosely.
Step 1 - Make a slip knot with the working thread and place it on the needle. Lay the length of scrap yarn alongside and below the working thread.
Step 2 - Bring the working thread downwards in front of, then underneath the waste yarn.
Step 3 - Now bring the working thread up and over the needle
Step 4 - Bring the working thread downwards in front of, then underneath the waste yarn.
Repeat steps 3 and 4 until you have the required number of stitches on the needle. End by moving the working thread in front of and under the waste yarn. Make sure you have an equal number of stitches around the waste yarn as you have on the needle.
This is what it will look like after a few rows. Note we have picked up the stitches with a small double point needle to better show the live stitches. You will do this when you are required to work these stitches in your pattern. The waste yarn can simply be slipped out from the cast on stitches with no effort.